Effortlessly Mock APIs with json-server: A Comprehensive Guide for Developers
Quick way to setup mock REST API for your frontend application
Introduction
In modern web development, creating and testing applications often requires a reliable backend to handle API requests and manage data. Setting up a full-fledged server and database can be time-consuming and complex, especially during the early stages of development or when working on smaller projects. This is where json-server comes to the rescue.
json-server is Node.js package, it is a powerful and lightweight tool that allows developers to set up a full fake REST API with zero coding in less than 30 seconds. This package can transform a simple JSON file into a robust, ready-to-use API, making it an invaluable asset for frontend developers, prototypers, and anyone looking to quickly mock backend functionalities.
As a frontend developer personally, I often need to test my applications against a backend API. However, setting up a backend just for testing purposes can be overkill. json-server provides a straightforward solution by allowing developers to create a mock backend that can handle typical CRUD (Create, Read, Update, Delete) operations. This helps in simulating real-world scenarios and ensures the frontend behaves as expected.
Let’s dive into how we can start to use json-server
Installation
You can install json-server globally using npm or yarn:
npm install -g json-server
# or
yarn global add json-server
You can also install it locally in any project
npm install --save-dev json-server
# or
yarn add --dev json-server
Creating a Mock Database
Create a db.json file in your project root. This file will act as your database. For example:
{
  "posts": [
    { "id": 1, "title": "Hello World", "author": "John Doe" },
    { "id": 2, "title": "Another Post", "author": "Jane Doe" }
  ],
  "comments": [
    { "id": 1, "body": "Nice post!", "postId": 1 },
    { "id": 2, "body": "Thanks for sharing.", "postId": 1 }
  ]
}
Running the Server
Start the server using the following command:
json-server --watch db.jsonBy default, json-server will start a server at http://localhost:3000 and provide routes for the resources defined in db.json. For example:
GET /postsGET /posts/1POST /postsPUT /posts/1DELETE /posts/1GET /commentsGET /comments/1
And Just like that, you have a backend server ready to test your frontend. You can test all the endpoints above using curl or postman as well. Below is an example of the response I get using postman.

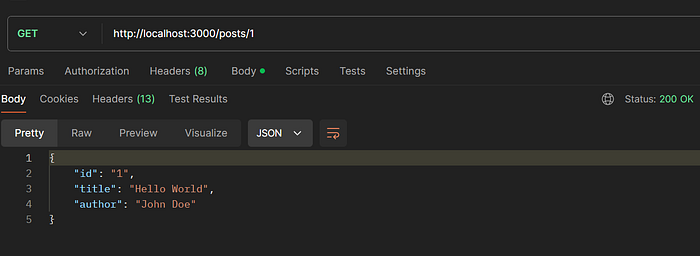
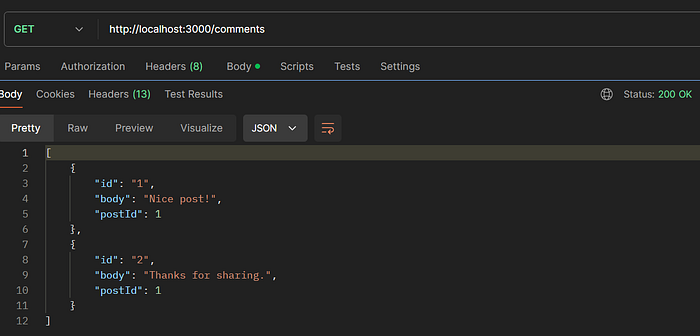
You can see that json-server automatically generates endpoints from the db.json file without any extra work. The file contains posts and comments data, each with properties including an id. json-server uses the keys of the JSON data to create these endpoints.
Custom Routes
By default, json-server automatically creates endpoints based on the structure of your db.json file. However, these default endpoints might not always match the specific patterns you use in your actual backend. To maintain consistency and flexibility, json-server allows you to define custom routes.
With custom routes, you can map your desired endpoint patterns to the data in your db.json file, ensuring that your mock API closely mimics your production API. This feature is particularly useful when you need to align your frontend development and testing environment with your backend's endpoint structure.
Example of Custom Routes
Here’s an example of how to set up custom routes:
Custom Routes Example
To customize these endpoints, create a routes.json file:
{
  "/api/posts": "/posts",
  "/api/comments": "/comments",
  "/blog/:resource/:id/show": "/:resource/:id"
}
Start json-server with the custom routes. Note the --routes option in the command.
json-server --watch db.json --routes routes.jsonNow, the endpoints will be:
/api/postsmapped to/posts/api/commentsmapped to/comments/blog/posts/:id/showmapped to/posts/:id/blog/comments/:id/showmapped to/comments/:id
Let’s dive a bit deeper into custom routes.
The custom routes mapping in routes.json are technically called route rewriters in json-server. They help you map custom URLs to the ones generated by json-server. Let's break them down:
Route Rewriting
{
  "/api/*": "/$1",
  "/blog/:resource/:id/show": "/:resource/:id"
}
One common pattern you might see people use for route rewriting is the first line above.
Pattern Definition:
"/api/*": This is the pattern that matches any URL starting with/api/. The*wildcard captures the rest of the URL following/api/."/$1": This defines how the matched URL should be rewritten. The$1refers to the captured part of the URL matched by the*wildcard.
How it works:
- Request to
/api/postswill be routed to/posts - Request to
/api/commentswill be routed to/comments
Example Scenarios
Request to /api/posts:
- Original URL:
/api/posts - Pattern Match:
/api/*capturespostsas* - Rewritten URL:
/$1becomes/posts - Result: The request to
/api/postsis handled by the/postsendpoint injson-server.
Request to /api/comments/1:
- Original URL:
/api/comments/1 - Pattern Match:
/api/*capturescomments/1as* - Rewritten URL:
/$1becomes/comments/1 - Result: The request to
/api/comments/1is handled by the/comments/1endpoint injson-server.
Line 2
"/blog/:resource/:id/show": "/:resource/:id"
This rule maps a more complex route to a simpler one.
How it works:
:resourceand:idare placeholders that match any resource name and ID respectively.- Request to
/blog/posts/1/showwill be routed to/posts/1 - Request to
/blog/comments/2/showwill be routed to/comments/2
This kind of route rewriting allows you to have more descriptive and user-friendly URLs. For example, you might want your users to see a URL like /blog/posts/1/show instead of /posts/1.
CRUD Operations
1. Create (POST)
To create a new resource, you send a POST request to the appropriate endpoint with the new resource data.
Example: Create a new post
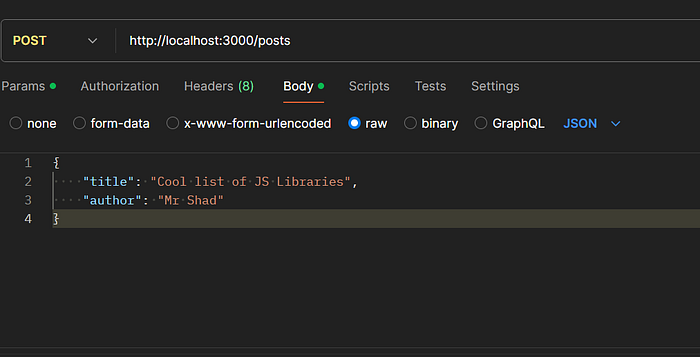
Response:
{
  "title": "Cool list of JS Libraries",
  "author": "Mr Shad",
  "id": "KiusFGY"
}
2. Update (PUT and PATCH)
To update an existing resource, you can use PUT or PATCH. PUT replaces the entire resource, while PATCH updates only the specified fields.
Example: Update post
See Request and Response below.

Delete (DELETE)
To delete a resource, you send a DELETE request to the appropriate endpoint with the resource ID.
Example: Delete a post
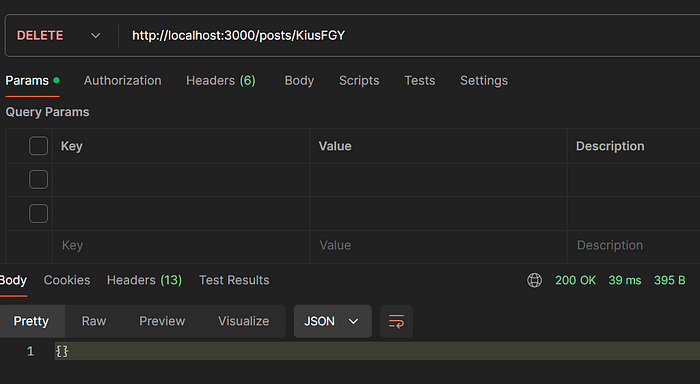
Response:
The response will usually be empty (status code 200 or 204).
Using curl
Here are curl examples for each operation:
- Create:
curl -X POST -H "Content-Type: application/json" -d '{"title": "New Post", "author": "Author Name"}' http://localhost:3000/posts- Update with PUT:
curl -X PUT -H "Content-Type: application/json" -d '{"title": "Updated Title", "author": "Updated Author"}' http://localhost:3000/posts/1- Update with PATCH:
curl -X PATCH -H "Content-Type: application/json" -d '{"title": "Partially Updated Title"}' http://localhost:3000/posts/1- Delete:
curl -X DELETE http://localhost:3000/posts/1Summary
- Create: Use
POSTto add new resources. - Update: Use
PUTto replace an entire resource orPATCHto update specific fields. - Delete: Use
DELETEto remove resources.
These operations allow you to fully manage your mock API using json-server.
NB: When you perform a CREAT, UPDATE or DELETE operation,
json-serverupdates thedb.jsonfile by adding, updating or removing the resource.json-serveracts like a real backend, so it modifies thedb.jsonfile accordingly when you create, update, or delete resources.
Q&A
Here are some questions I was asking myself and after my research the answers I got to those questions. You might be asking these questions as well.
Question 1.
When you perform CRUD operations, does json-server update the db.json file locally for you to see the changes.
Answer: YES. The explanation is the above.
Question 2
Are the IDs supposed to be numbers or you can use any kind of Ids like UUID?
Answer:
In json-server, you can use UUIDs or any other string-unique IDs as well. json-server does not enforce any specific format for IDs, so you have the flexibility to use whatever suits your needs.
Question 3
Can I separate my db files? For example, I want to have a file that stores posts and a different file that stores comments. If yes, how would the mutation (CRUD operations) work to modify these separate files?
Answer:
Yes, you can separate your database files to store different resources. You can use multiple JSON files (e.g., posts.json and comments.json) and combine them at runtime with a custom server script in json-server. This setup allows you to perform CRUD operations on the separate files.
I have a step-by-step YouTube tutorial here that explains how to set this up and handle mutations on these separate files.
End of article. I will be happy to answer any other questions you may have.
Thanks for reading.
Leave a 👏